How to Build a Soffit Box with Recessed Lighting
The Big Picture: How to build a tray ceiling
If you’re bored by a plain boxy room, take heart. You don’t have to rip apart walls and ceilings to make the space more inviting, better lit and more dramatic. The simple soffit lighting project we show here will do all that. A soffit is a dropped section of ceiling that’s usually positioned along the walls. It creates a multi-height ceiling, which in itself adds a visual feature. But even better, it offers a perfect home for lighting—general lighting for the room as a whole and recessed lights for practical uses like illuminating closets and reading, as well as for highlighting artwork and display shelves.
Before the Remodel:

In this article, we’ll show you how to dramatically improve any room with a soffit and lights. This room, in particular, was a dull, drab bedroom before the new lights and soffits. We’ll walk you through a simple soffit building method that leaves the existing ceilings and walls intact, so there’s no messy drywall repair work. And we’ll show you how to install electrical fixtures and run wires inside the new soffit lighting so you won’t have to open up walls for the new electrical work.
If you’ve successfully tackled any simple carpentry project, such as building a deck or installing utility shelves, you’re more than qualified to handle this project. Most of the project is just a matter of cutting 2x4s and plywood to length and screwing them into place. Start to finish, you can complete this project in two easy weekends.
What you’ll need for this tray ceiling framing project:
You’ll only need everyday carpentry tools, including a 4-ft. level, circular saw, screw gun, a jigsaw and a miter saw for accurate cuts on the trim.
You’ll also need basic electrical skills to complete the wiring (see “Planning the Wiring” below). We won’t show in this article how to set new electrical boxes, run new wires or install the fixtures. If you’re unsure about these details, hire an electrician. Apply for an electrical permit before you start. In the meantime, check out 10 things your electrician wants you to know.
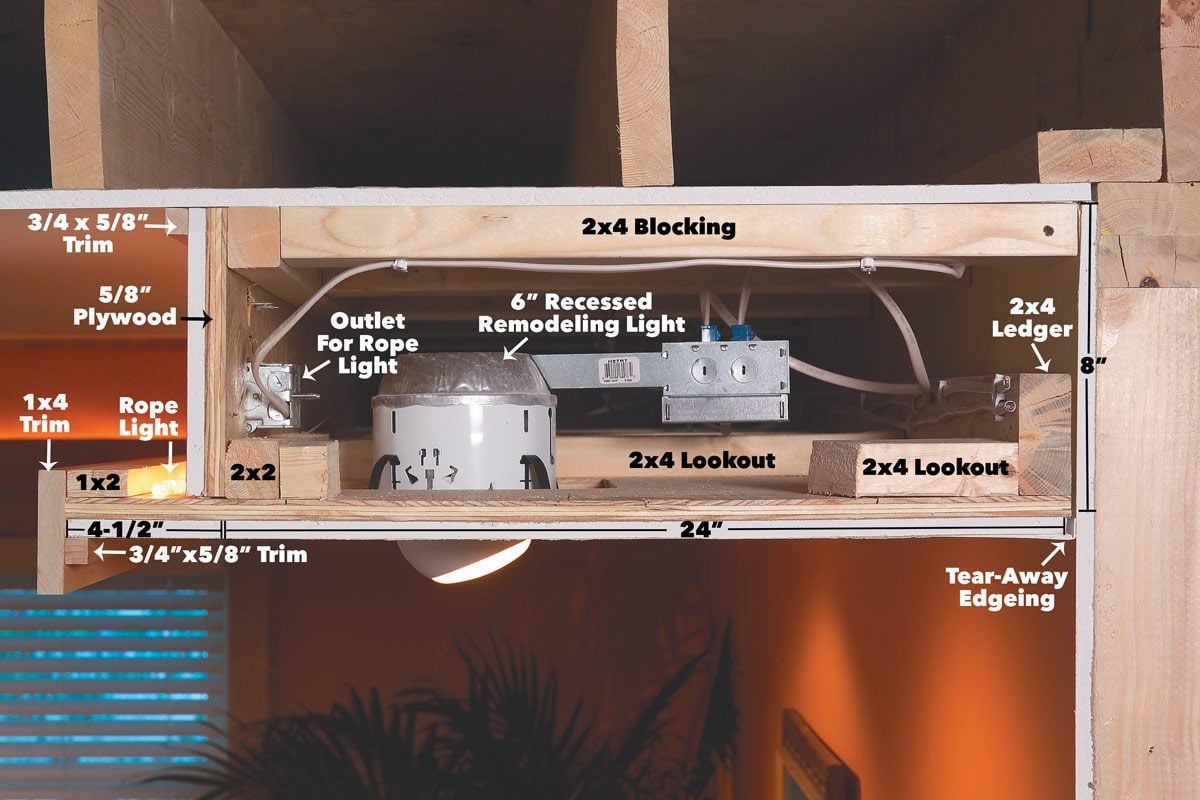
Figure A: Designing your soffit lighting

This soffit lighting cross-section illustrates the framing, wiring and trim details. You can build deeper or taller soffits, but it’s important to make yours at least 8 in. high to leave enough room for mounting recessed lights.
Our soffits are 8 in. high and 28 in. wide, and they’ll fit in any room with 8-ft. or higher ceilings (as long as the door and window trim is at least 10 in. from the ceiling). You can make soffits wider or taller to suit larger rooms if you wish. But the 8-in.height is the minimum needed to handle the depth of the recessed lights. The 28-in.width is about the minimum needed to position recessed lights far enough from walls to effectively light wall-hung features. Larger rooms may benefit visually with upsized soffits.
We added three wood trim bands to finish off the soffit (Figure A). Choose wood profiles, types and finishes for these that match or contrast with the room’s other trim. Our trim is lightly stained 3/4-in. thick maple.
The lighting fixtures in our soffit are of two types:
- “Rope” lighting for unobtrusive mood lighting and recessed soffit lighting fixtures for specific lighting tasks. Rope lighting’s all the rage among designers. It’s cheap, and it can be cut to length for shorter runs or spliced together for longer ones. Special splicing connections and end caps make that easy. Measure the inner perimeter of the soffit to determine how much rope light you’ll need. The home center will carry lengths from just a few feet to dozens of feet. The rope light is controlled by two three-way switches so the light can be flipped from either the bedside (for those midnight bathroom runs) or from near the door.
- Recessed lights are perfect for specific lighting tasks. You’ll need to select trim rings and bulbs designed for your purposes. We’ll say more about that in “Selecting Recessed Lights” below.
Comments
Post a Comment